UPS Shipping Label: How to Create, Print and Reprint One
To create a UPS shipping label, enter the sender, recipient, package and service details in UPS’s shipping tool or your shipping platform, then complete the payment or billing step. Print the label, check that its barcode is clear and attach it securely to the package. To reprint an existing label, return to the original shipment record rather than buying another shipment.
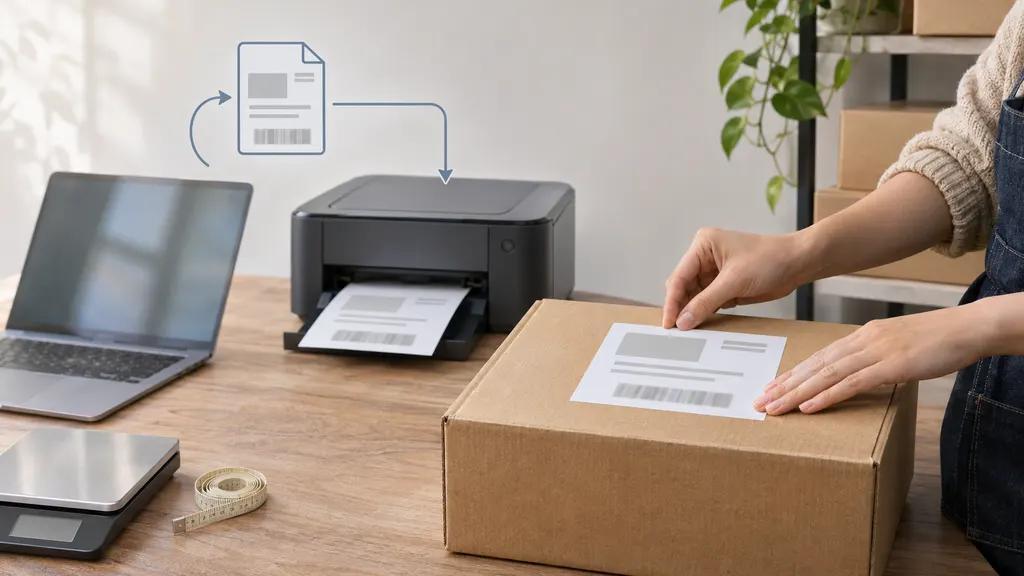
The most useful distinction is between printing another copy of the same label and creating a new label for a different shipment. A replacement printout should keep the original tracking number. A separate parcel needs its own valid package label. This guide focuses on UPS parcel shipments; freight and specialized shipments can follow different workflows.
Choose the right place to get your label
You do not always need to create a label yourself. Start by identifying who arranged the shipment and where its record lives.
- You are sending your own package: Start with the UPS shipping tool, or use the shipping system through which you normally buy postage.
- You are fulfilling an ecommerce order: Create and retrieve the label in the store, order management system or shipping platform that manages that shipment. Confirm that the selected carrier and service match your fulfillment plan.
- You are returning an online purchase: Check the retailer’s return instructions first. You may already have a prepaid label or a code for a supported return method.
- You only need another printout: Look for the original label file, confirmation message or shipment record before starting a new shipment.
A label purchased through another platform may need to be reprinted or canceled through that platform. Do not assume that signing in to a UPS account will display every label created elsewhere.
What you need before creating a UPS shipping label
Pack the shipment before measuring it. Dimensions taken from an empty carton, or a weight that excludes cushioning, can produce inaccurate shipping details.
- Sender information: Name, address and the contact details requested by the shipping tool.
- Recipient information: Name, complete delivery address, postal code and apartment, suite or unit number where applicable.
- Return address: The appropriate address for an undeliverable package. Check it rather than accepting an outdated saved address.
- Package measurements: The packed weight and outside dimensions, using the units requested on screen.
- Service requirements: Destination, delivery needs and any relevant options offered for that shipment.
- Billing information: A supported payment method or authorized account billing arrangement.
- International shipment details: Contents, value and any customs information or documents required for the route and goods.
Shipping charges are not determined by the label’s paper size. They depend on the shipment and billing details, which can include service, destination, package measurements and applicable additional charges. Review the actual quote rather than relying on a general price example.
How to create a UPS shipping label
1. Open the shipping workflow
Start at UPS’s shipping tool or the platform where you intend to manage the shipment. Sign in if you want to use available account features and saved information. Follow the options presented for your location; account requirements and checkout choices can differ.
If you are fulfilling an order, confirm that you have opened the correct order and fulfillment location. This prevents a valid label from being associated with the wrong customer or warehouse.
2. Enter and check both addresses
Enter the origin and destination details carefully. Pay particular attention to postal codes, street numbers and unit numbers. If the system suggests an address correction, compare it with the recipient’s information instead of accepting it automatically.
For business shipments, include the company name and any recipient or department details needed for delivery. A company name does not replace a complete street address.
3. Describe the package accurately
Select the appropriate packaging option and enter the packed weight and dimensions. Do not select carrier-provided packaging simply because your own box looks similar. If you are sending multiple parcels, follow the workflow for each package and verify that every parcel receives the correct label.
4. Select a service and review any additional requirements
Choose from the services offered for the shipment. Compare the displayed delivery information and price with your needs, and review any optional services before selecting them. Do not assume that the lowest-priced option meets a specific delivery deadline.
For an international shipment, complete the requested customs information accurately. A shipping label is not necessarily the only document you need. The required paperwork depends on the destination, contents and shipment arrangement.
5. Review, pay and save the shipment
Before completing the transaction, check the recipient, return address, service, package count, weight and dimensions. Review the billing details and any additional charges shown.
After completing the shipment, save the label using the options available in that workflow. Keep the tracking number and confirmation details as well. If a downloadable file is offered, storing it with the order record can make later reprinting easier.
Creating a label does not hand the package to UPS. Arrange an appropriate pickup or drop-off separately, following the options available for your shipment.
How to print the label so it can be scanned
You can use a suitable standard printer or a compatible label printer, provided the output matches the label format and remains readable. Follow the print instructions supplied by the shipping tool rather than forcing every label into the same paper size.
Printing on ordinary paper
- Open the label file or print view and select the correct printer.
- Choose the paper size and orientation that match the document.
- Check the preview for clipped edges, missing information or an unusually small barcode.
- Print a clear copy and inspect the barcode before attaching it.
- Secure the label flat to the package without covering or distorting the barcode.
Black-and-white output is generally sufficient when the label is clear and complete. If the printout is faint, streaked or smudged, fix the printer issue and print another copy. Do not redraw a barcode or try to repair it with a pen.
Printing with a thermal label printer
A common parcel-label format is 4 × 6 inches, but use the format actually supplied by your shipping system. Set the printer’s paper size to match and check its orientation. If the label is cut off or feeds incorrectly, review the driver settings and calibrate the printer according to its manufacturer’s instructions.
A full-page document is not automatically suitable for direct printing on a small thermal label. Where available, choose a printer-ready label format instead of repeatedly shrinking or cropping the page.
Attaching the label
Place the label on a flat, visible surface. Avoid folding it around an edge, placing it across a seam or leaving wrinkles through the barcode. Remove or fully cover old shipping labels and unrelated routing barcodes on reused packaging. Keep required safety or regulatory markings intact.
Use secure attachment that does not obscure the label. UPS’s shipping support resources provide packaging and shipment-preparation guidance for situations that need additional instructions.
How to reprint an existing UPS shipping label
Reprint from the system that created the shipment. Start with the original record, not a new shipping form.
- Check saved files and messages. Look for the downloaded label or an original confirmation containing a label-access link.
- Open the original shipping account or platform. Find the relevant shipment, order or shipping-history record.
- Verify the shipment. Match the recipient, shipment date, order reference and tracking number.
- Use the available print or reprint option. The wording and location vary by platform and shipment workflow.
- Inspect the replacement. Confirm that the tracking number matches the original and remove the damaged copy before attaching the replacement.
Do not assume that a label remains available online indefinitely. If you cannot retrieve it, contact the platform that issued it or UPS, as appropriate, with the shipment details. A tracking result alone is not a substitute for a complete shipping label.
Reprinting the same shipment’s label is different from purchasing a second shipment. However, clicking through a new checkout can create another label and a separate billing record. If that happens accidentally, review the unused shipment’s cancellation or voiding options with its issuer; do not assume it will disappear automatically.
When reprinting is not the right fix
- The delivery address is wrong: Printing another copy preserves the same error. Before handoff, use the issuer’s supported correction process or create a corrected shipment and address the unused label separately. After handoff, contact UPS about available options.
- The parcel’s weight, dimensions or service changed: Check whether the original shipment can be updated. Editing the visible text on a downloaded label does not update the shipment record.
- You have another package to send: Do not reuse a label already assigned to a different parcel. Each package needs its own valid label, including within a multi-package shipment.
- The label has already been voided: A saved file is not proof that the shipment remains valid. Confirm its status before using it.
The practical rule is simple: reprint for a printing problem; correct or replace the shipment for a shipment-data problem.
Return labels, QR codes and printer-free options
For a retailer return, follow the retailer’s instructions before buying a UPS label. The return may require authorization, a specific destination or a particular service. Buying your own label does not automatically satisfy the retailer’s returns policy or make the postage reimbursable.
If you receive a printable return label, print and attach it as instructed. If you receive a QR code or another mobile code, check the instructions for the supported location and whether you need to bring the item packaged. A code is not automatically a printable shipping label, and not every UPS location necessarily supports every code-based workflow.
When you have no printer, first check whether the shipment includes a supported mobile-code option. Otherwise, ask a suitable printing or shipping location whether it can print your existing label and whether a fee applies. Confirm this before traveling, and keep the label file accessible.
Before you hand over the package
- Match the recipient and label to the physical package.
- Check that the barcode is clear and the label is securely attached.
- Remove obsolete shipping labels from reused boxes.
- Include and attach any required international documents as instructed.
- Confirm that your selected drop-off or pickup method accepts the shipment.
- Keep the tracking number and obtain a handoff receipt where available.
A tracking status indicating that a label has been created should not, by itself, be treated as proof that UPS has received the parcel. For ecommerce fulfillment, keep label creation and carrier handoff as separate operational steps. If tracking does not progress after an expected handoff, check your receipt and shipment records before deciding what action to take.
FAQ
Can I print a UPS shipping label on regular paper?
Yes, provided the complete label prints clearly and is securely attached. Use the document’s intended print format, inspect the barcode and avoid folds, clipping or attachment that obscures information.
Does reprinting a label create another shipment?
Reprinting the original label should reproduce the existing shipment, not create a new one. Check that the tracking number remains the same. Starting a new shipment and completing checkout is a different action and can create a separate charge.
Can I change the address directly on the printed label?
Do not rely on handwritten changes or edits to the label file. They do not reliably update the electronic shipment information. Use the original shipping system’s correction process or contact the issuer. If UPS already has the package, ask about the options available for that shipment.
Can two boxes use copies of the same label?
No. Each parcel needs its own valid package label. For a multi-package shipment, follow the shipping system’s instructions and match each generated label to the appropriate box.
Does a UPS shipping label expire?
Do not assume that every outbound label, return label and third-party-issued label has the same validity period. Check the issuer’s instructions and shipment status, particularly if the label is old, has been canceled or no longer matches the shipment details.
What should I do if I cannot find the label after paying?
Check your downloads, confirmation messages and the original shipment record. Confirm that the transaction completed before buying another label. If you still cannot retrieve it, contact the issuing platform or UPS with the payment and shipment details.
Sources
- UPS: Create a shipment — official shipment-entry workflow; available options depend on location and shipment details.
- UPS: How to ship a package — package preparation, labeling and sending guidance.
- UPS: Shipping support — official support resources for shipment preparation and related shipping questions.