How to Ship Shoes without a Box: Safe Packing Methods and USPS Rules
Yes, you can ship shoes without a traditional shoe box, but you still need to protect the pair from crushing, moisture, dirt, and separation during handling. The safest approach is to wrap each shoe, secure the pair together, add cushioning, and place everything inside a strong shipping mailer or another rigid outer package. USPS does not require footwear to be shipped in a retail shoe box, but the package must be properly closed, addressed, and durable enough for normal postal handling.
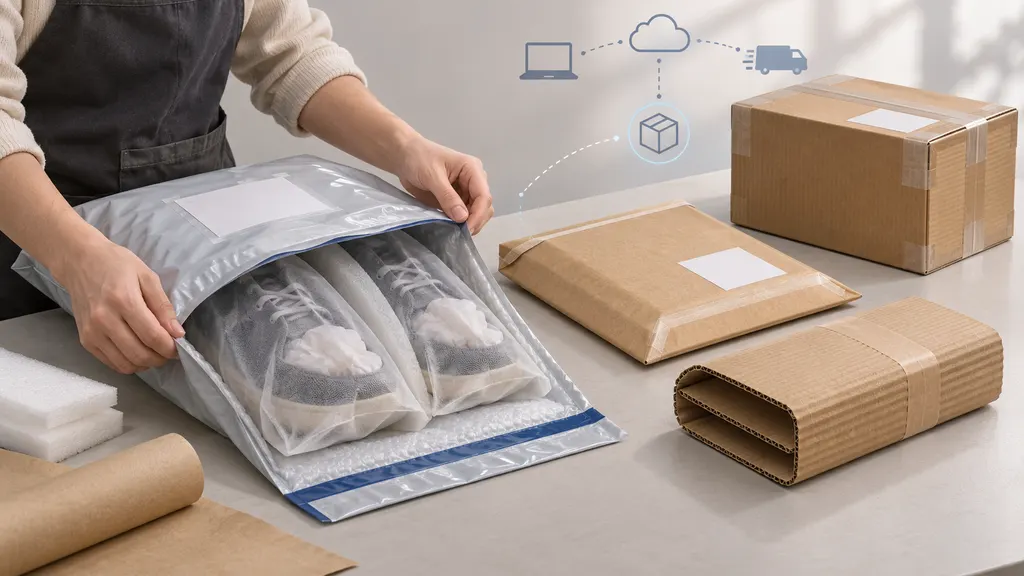
This guide explains practical box-free packing methods, when a poly mailer is appropriate, when a rigid mailer is safer, and which USPS packaging and labeling rules to check before handing over the parcel.
Can You Ship Shoes Without a Box?
You can ship shoes without their original shoe box if the shoes are placed in suitable outer packaging. “Without a box” usually means without a retail shoebox, not without any protective container. Sending loose shoes in a thin plastic bag is risky because soles, buckles, heels, and other hard edges can tear the package or damage nearby mail.
A box-free shipment can work well for soft, lightweight footwear such as sneakers, sandals, slippers, canvas shoes, and fabric flats. It requires more care for structured leather shoes, boots, high heels, shoes with decorative hardware, and footwear with pointed or rigid parts. Those items are more likely to be crushed or to puncture a flexible mailer.
The package should meet three practical tests:
- The shoes cannot move freely enough to strike each other or escape from the package.
- Hard edges and dirty soles cannot rub directly against the outer mailer.
- The finished parcel can be sealed securely and still hold its shipping label flat and legibly.
Best Packing Method for Shoes Without a Shoebox
1. Clean and prepare the shoes
Remove loose dirt from the soles and let the shoes dry completely before packing. Moisture trapped inside a sealed mailer can cause odor, staining, or material damage. Remove temporary inserts, loose tags, or accessories that could scratch the shoes or fall out during transit.
If the shoes have laces, tie them loosely or tuck them inside the shoes. Do not tighten laces so much that they deform the upper. For boots or shoes with a tall shaft, use clean paper or soft packing material to help them retain their shape.
2. Protect each shoe separately
Wrap each shoe in tissue paper, clean kraft paper, a soft cloth, or a dedicated shoe bag. Individual wrapping prevents soles from rubbing against uppers and reduces the chance that buckles, metal eyelets, or decorative parts will scratch the other shoe.
Do not use newspaper directly against light-colored leather, suede, or fabric because ink can transfer. Bubble wrap can provide cushioning, but it should not be the only layer around footwear. Place the bubbles on the outside of the soft protective layer where possible, and avoid compressing delicate materials too tightly.
3. Keep the pair together
Place the wrapped shoes sole-to-sole or toe-to-heel, depending on their shape. Secure them with a reusable strap, paper band, or a small amount of tape applied to the wrapping rather than directly to the shoe. The goal is to stop the pair from separating without leaving adhesive residue.
If the shoes include removable insoles, spare laces, or small accessories, put those items in a separate sealed pouch. Do not leave small parts loose inside the outer mailer.
4. Add a protective inner layer
Put the wrapped pair inside a plastic bag, waterproof shoe bag, or sealed inner pouch. This layer is not a substitute for strong outer packaging. It is a moisture and containment barrier that helps keep the shoes together if the outer mailer is scuffed or torn.
Leave a little room around the shoes instead of forcing them into a tight sleeve. Excessive compression can bend heels, crease leather, or distort structured footwear.
5. Choose the right outer package
For soft and relatively flat shoes, a padded poly mailer can be suitable. Choose one with a strong adhesive closure and enough space to close without stretching the seam. A plain thin plastic bag is not an adequate shipping mailer because it offers little resistance to tearing or punctures.
For heavier, rigid, pointed, or expensive shoes, use a rigid cardboard mailer, a corrugated wrap, or another crush-resistant outer package. This is still a box-free shipment if you are not using a traditional shoebox, but it provides much better protection than a flexible mailer.
A useful rule is simple: if pressing the package could visibly deform the shoes, the outer packaging is probably too flexible. High heels, leather boots, cleated footwear, and shoes with large buckles generally deserve rigid protection.
6. Fill empty space and seal every opening
If the outer package has extra room, add crumpled kraft paper or another lightweight filler so the shoes do not slide from one end to the other. Avoid heavy filler that adds unnecessary postage weight. Do not use loose foam beads, which can escape if the package opens.
Seal the main closure completely. If the mailer has a self-sealing strip, press along its full length. For a rigid mailer, reinforce the closure with shipping tape. Do not cover the address with tape that creates glare or makes the label difficult to scan. If the package has a flap, tape all exposed seams that could open during handling.
USPS Rules to Check Before Mailing Shoes
USPS packaging requirements apply to the finished parcel, not just the shoes inside it. The outer packaging must be strong enough for the contents, closed securely, and suitable for the selected service. USPS guidance also requires the mailpiece to carry a complete and readable address, including the destination ZIP Code and a return address when appropriate.
Use packaging that can survive handling
USPS Publication 52 explains general mailing standards for packaging, closures, addressing, and restricted contents. The practical takeaway for shoes is that the parcel should not have exposed sharp edges, loose parts, leaking materials, or an insecure opening. A package that arrives damaged can also delay delivery or cause the contents to be separated from the label.
Do not wrap a shoe shipment in decorative gift paper as the only outer layer. Paper can tear, and a loose outer covering can interfere with processing. If you want the parcel to look presentable, put the gift wrapping inside the shipping package and use a proper outer mailer.
Check size and weight limits for the service
Package dimensions and weight can affect which USPS service is available and how postage is calculated. Measure and weigh the sealed package, not just the footwear. A padded mailer may be small, while rigid protection can increase both thickness and dimensional measurements.
Before buying postage, check the current requirements for the service you intend to use. USPS service rules can differ, and restrictions may change. If the package is unusually large, heavy, or shaped, confirm eligibility using the current USPS service and price information rather than relying on an old label or a general shipping estimate.
Place the label on a flat surface
Attach the shipping label to the largest flat surface available. Keep the barcode away from seams, folds, heavy tape, and curved edges. Make sure the old labels and barcodes have been removed or fully covered if you reuse an outer mailer.
Write the recipient’s address clearly and include a return address. A second address slip inside the package is a sensible recovery measure, especially for higher-value footwear, but it does not replace the exterior label. If the outer packaging tears, an interior slip may help identify the shipment, but it cannot guarantee recovery.
Do not assume free USPS packaging is suitable for every shipment
USPS-branded packaging is intended for the services and uses described by USPS. Do not place a package in a service-specific envelope or box unless you are using that service according to its conditions. If you choose a generic mailer, make sure its dimensions and construction are appropriate for the shoes and the postage you purchase.
When a Poly Mailer Is a Good Choice
A padded poly mailer is often practical when the shoes are lightweight, flexible, and not easily crushed. It can reduce bulk and may cost less to pack than a rigid container. It is also convenient for returns, casual footwear, and shipments where keeping the package compact matters.
A poly mailer is less suitable when:
- The shoes have sharp heels, cleats, spikes, rigid decorations, or exposed metal parts.
- The pair is heavy enough to stress the mailer’s seams.
- The shoes are valuable, collectible, or difficult to replace.
- The footwear must retain a precise shape, such as formal leather shoes or tall boots.
- The parcel will contain additional hard items that could puncture the mailer.
In those cases, choose a rigid mailer or a sturdy corrugated package. The small increase in packing material can reduce the risk of damage, repacking, or a customer complaint.
How to Estimate the Package and Postage
Pack the shoes completely before measuring. Record the length, width, height, and total weight of the sealed parcel. Round measurements only as required by the postage tool or carrier instructions. Enter the actual origin and destination information, because the route and service can affect the available options.
Compare the total cost of postage with the value of the shoes and the risk of damage. A compact package is not automatically the cheapest option if it requires extra handling, causes a dimensional adjustment, or results in a damaged delivery. For online sellers, photograph the packed parcel and retain the acceptance receipt or tracking record until delivery is confirmed.
Final Packing Checklist
- Clean and dry both shoes.
- Protect each shoe with paper or a soft bag.
- Secure the pair and separately contain any accessories.
- Add an inner waterproof layer.
- Select a padded mailer or rigid outer package based on the shoe’s shape and weight.
- Fill movement space without over-compressing the footwear.
- Seal every opening and reinforce vulnerable seams.
- Measure and weigh the finished parcel.
- Apply a clear label to a flat surface and remove old barcodes.
- Verify the current USPS service requirements before purchasing postage.
FAQ
Can I mail shoes in a plastic bag?
You can use a plastic bag as an inner moisture barrier, but a thin grocery or retail bag should not be the only outer packaging. Use a purpose-built padded mailer or rigid outer package that can resist tearing and keep the shoes contained.
Should shoes be wrapped individually?
Yes. Individual wrapping limits rubbing and helps protect uppers from soles, buckles, and other hard parts. It also makes it less likely that the pair will become separated during packing or unpacking.
Is a shoebox required by USPS?
A retail shoebox is not required simply because the contents are shoes. The shipment still needs suitable outer packaging, a secure closure, a readable address, and compliance with the size, weight, and service rules that apply to the selected USPS service.
What is the safest way to ship high heels without a box?
Wrap each shoe separately, protect the heel and any pointed parts, secure the pair, and use a rigid mailer or sturdy corrugated outer package. A flexible mailer may be punctured or crushed by concentrated pressure from the heels.
Can I reuse a shipping mailer?
Yes, if it remains clean, dry, structurally sound, and large enough for the new shipment. Remove or completely cover old addresses, barcodes, and service markings so the new label is the only scannable shipping information on the outside.